Afternoon gorgeous girlie’s! Are you well? I’m a little hyperactive today… bouncing around the office like a loon and cackling away at everything. It could be that the SUN IS OUT {yes I really do need to shout that} or it could be that I made it into the top 100 UK Wedding Blogs at No. 40. It’s made my week I tell you, made my week :-D
You may remember a wee while ago I posted a fab comp to win a beautiful Wedding Charm Cluster by Something Forever… well the talented lady who makes these stunning keepsakes has put together a rather awesome wedding DIY tutorial for you. A how to make your own pretty wedding accessory ~ a DIY orchid flower. Jenny made hers using bits of broken jewellery, I mean who doesn’t have a collection of random earrings that are just TOO pretty to throw away?
So if you follow this tutorial my loves, you can make a fab accessory and wear it as a brooch, a headband or even attach it to your wedding dress. Here’s how…
I have been very detailed in showing you each step, there are twenty three in all, but some of them are obvious, and this should take you less than an hour to make.
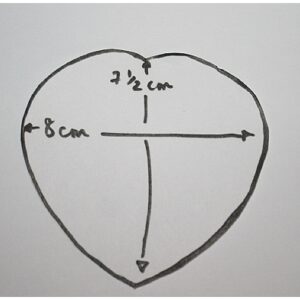
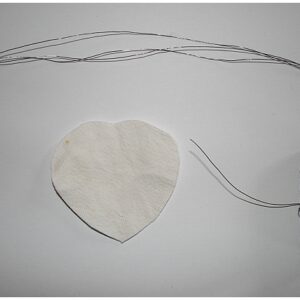
Step 1:
Trace out onto paper the shape of the petals. The measurements for mine are shown above.
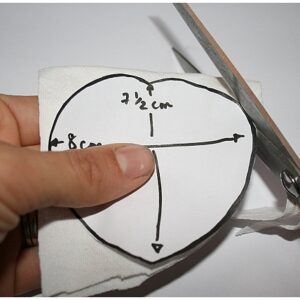
Step 2:
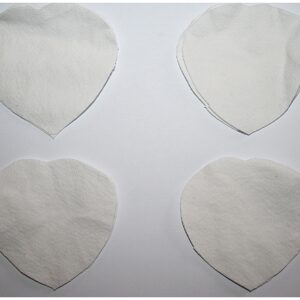
Choose the fabric that you want to use, I have used white linen but you could use whatever you wanted, in any colour. Fold the fabric in half, and cut around the template.
You will need to do this 4 times, so that you have 8 pieces altogether. 4 fronts, and 4 backs.
Step 3:
Cut three wire pieces for each leaf, you will need 12 in total. I cut mine to about 15 centimetres, you can trim them off at the end.
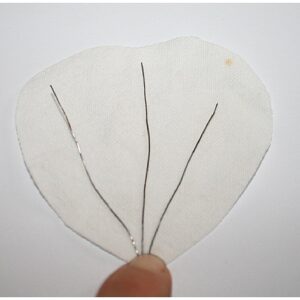
Step 4:
Place the 3 wire pieces onto one of the petals, as shown above.
Step 5:
Cover the petal with glue. You could do this before you placed the wire but I find it easier to get the positioning of the wire right first and then glue.
Step 6:
Cover the petal and wire with the matching other petal, that you cut.
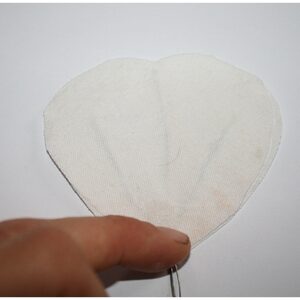
Step 7:
Press down onto the petal/wire/petal with the palm of your hand.
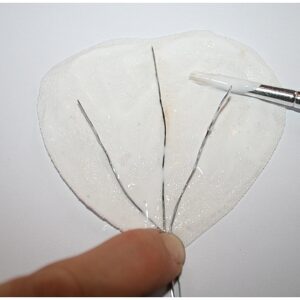
Step 8:
Twist the wires, at the bottom of the petal, a couple of times.
Step 9:
Put some more glue onto the outside fabric at the bottom of the petal. Set aside to dry.
Step 10:
Repeat steps 4 to 9, three more times, so that you have 4 petals in total.
Step 11:
You are going to start layering up your petals to make the flower. Do this by putting the ends of the petals together, crossing over the wire stems.
Step 12:
Create a clover shape with three of the petals, as shown above.
Step 13:
Bend the metal of the remaining petal downwards, as shown above. And then place together with the other petals. It is easier to bend the metal like this, than attempting to put all four petals together and then shaping.
Step 14:
Twist to the wires together. You will notice that the material is starting to look a bit grubby. This will be covered by jewellery, so there is nothing to worry about.
Keep twisting until all of the four stems become one.
This is what your flower should look like.
Step 15:
From the same fabric that you made the flowers, cut yourself a long thin strip, about 25 cms.
Step 16:
Place one end of the fabric onto the centre of the flower, just above the wire stem. Start wrapping the fabric tightly around the whole stem.
Step 17:
Glue each end in place. You could also sew these for added security.
Step 18:
Choose broken pieces of jewellery that you would like to have in the centre of your piece. I chose a few pieces, placed them onto the flower, then decided which ones I liked, and therefore was going to use.
Step 19:
I used an old necklace to make the stamen. I simply cut the necklace into 5 pieces and placed onto the flower centre.
Then sewed the first four stones onto the fabric, I repeated this with each of the 5 pieces.
Step 20:
I then chose a broken earring to have as the in the centre of my flower.
And sewed it into place.
Step 21:
And placed another broken earring into the very centre centre of the piece.
And then too sewed that into place.
Step 22:
To finish off the piece, I manipulated the petals. Remember you can bend the petals into any shape you want, over and over again.
Step 23:
The last thing to do is sew onto a broach clip, or a headband or the flower onto a bag…

And that’s it. Finished.

Wow Jenny! Thank you sooooo much for sharing this gorgeous wedding tutorial, you’re gonna make a whole lotta ladies v. v. happy.
Let me know if you are one?
 View the Gallery